Create It! Camp is a week-long interactive art workshop for local middle and high school students funded by a Teen Tech Week mini-grant from YALSA and Best Buy. Teens created interactive art projects using Makey Makey invention kits, MIT's Scratch website, and Bare conductive paint. This program is especially fun to do because it can provide valuable experiences to many teens (or other age groups) on a recurring basis after one initial investment in the technology used to create the art. In our community, this program had a key collaborative element that strengthened relationships with our area public and private schools and our local art museum, the Hopewell Museum. Collaboration with community partners is a great way to make your library a noticeable presence in your town and county, and it makes more people aware of the services and materials you can provide.
The Hopewell Museum hosted a series of five 90-minute workshops during Teen Tech Week, with all five area schools sending 10 students each to participate. We served 50 students and their teachers during this period. Students were transported to the Museum by bus, with transportation paid for by a museum scholarship program provided by the local Rotary Club.
Type: Active
Age: High school
Optimal size: 6-10
Estimated cost: $100+
Planning time: 2-5 hours
Frequency: One-time
Learning outcomes
Students who participated in this program learned the basics of designing programming using MIT’s Scratch, which can serve as a foundation for future experimentation with coding using languages such as Python.
You can also use this program as an opportunity to teach students about how circuits work, as well as the physical science of electricity. The conductive Bare Paint we used allows students to draw their own circuits. An explanation of how circuits work encourages students to experiment on their own while also allowing them to understand a cornerstone of the technology used in our modern world.
The Makey Makey invention kits act as bridges between conductive materials and a computer, and can be used to explain physical science principles to your students. Identifying which conductive materials (coins, pencil graphite, fruit, aluminum cans, other people). Which materials work best as conductors? Does it matter how many people are part of a circuit so long as it is complete? Asking these questions encourages inquisitiveness and critical thinking, and teaches your students about electricity as well.
So why include art? Art is a disappearing subject in many of today’s schools, and especially from low-income schools like the ones in our rural area of Paris, Kentucky, but its positive effects speak for themselves. In Create It! Camp, students were asked to create not simply a practical project to fulfill a utilitarian purpose but rather a work of art that was designed to be beautiful and fun as well as interactive. The art element made the students more playful, more inquisitive, and bolder in their experimentation.
One group of students even discovered, through analysis and critical thinking, how to connect two computers to one piece of artwork, giving them the ability to use one controller to direct multiple computers at once. To see this in action, please follow the link below.
https://www.youtube.com/watch?v=dJ0aULNpK-Q
This was done without any direction or advice from supervising adults, and comes purely from the freeing element of the artwork. Combining art with technology in this way encourages interdisciplinary experimentation in the students you work with.
Instructions
Create It! Camp uses two primary pieces of maker technology:
- Makey Makey Invention Kit (Amazon ID: B008SFLEPE, $39.99)
- Bare Paint Conductive Paint Pen (Amazon ID: B00B888LQ8, $10.95)
Other materials that you’ll need:
- Drawing paper
- Small alligator clips
- Hair dryer(s)
- Laptop(s) or computer(s) with an internet connection
- Plenty of table space to work with
The technology aspect of this program is relatively straightforward. Makey Makey invention kits act as a bridge between a computer and a DIY controller, whether it be made of bananas, friends, or other conductive materials. There are six keyboard commands represented on the Makey Makey touchpad: the directional arrows, the space bar, and the mouse click. Using alligator clips (some come with the invention kits, although you can purchase more alligator clips at hardware stores or online), you can connect each touchpad with a conductive material of your choice. For example, if you connect a penny to the “space” touchpad on your Makey Makey, that penny has now become your space bar. IMPORTANT: In addition to the six touchpads on the Makey Makey, there is an area called “Earth.” This is your ground, and you MUST be connected, either by touching it directly or with an alligator clip, to your ground for the circuit you create to work. There is a tutorial page and video on Makey Makey’s website reviewing all this information.
We connected ourMakeyMakey invention kits to art created using Bare Electric Paint’s paint pen on regular drawing paper. Bare Paint also has jars of paint that can be used with brushes, but we liked using the paint pens, as they last a long time and are simply a lot easier and cleaner to use than paint with brushes. To draw an interactive artwork to be used withMakeyMakey kits, draw at least six lines with the paint pen. Below is an example of an interactive art project for your reference.
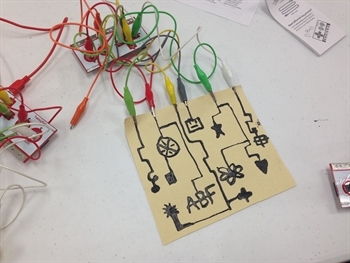
An example of an interactive art project created using Makey Makey and Bare Paint.
These lines stand in as “wires” that allow messages to travel from the computer to the Makey Makey to the alligator clips, and, finally, to the Bare Paint on the paper. Buttons and objects can be drawn along these lines to be pressed by the user, but it is important to not overlap the “wires” as the computer could interpret the buttons on the overlapped lines as two buttons at once. Other than not “crossing the streams,” the design and placement of buttons and wires on the page is only limited by the size of the paper and the students’ imaginations. Since Bare Paint does take some time to dry, it’s a good idea to have one or more hair dryers on hand to make sure the artwork is usable within the timeframe of the workshop (about an hour). There are examples of interactive artwork on Bare Paint’s website.
During the workshop, we provided 10 Makey Makey invention kits, as well as a Bare Paint pen and several pieces of drawing paper for each student. We also provided six laptops students could use to test out their interactive artwork.
Makey Makey has several example projects on its website, but we largely used the MIT’s programming playground Scratch, available for free on http://scratch.mit.edu. Searching for “Makey Makey” on Scratch brings up many musical and gaming projects that students can use to test out their interactive artworks. Since Scratch allows users to alter pre-existing projects, the students creating the art can personalize a game, instrument, or application to go thematically with their project. For example, a student could change the notes on a piano project to a higher pitch or to another sound entirely. On Scratch’s home page, a “Try It Out” button leads students to a fantastic interactive tutorial. Students can also create an account on Scratch to experiment further on their own. Two books I found particularly helpful when using Scratch were Coding Games in Scratch by John Woodcock and Scratch Programming for Teens by Jerry Lee Ford, Jr.
As far as the structure of each workshop, we began with a twenty-minute explanation of how to use Scratch, Makey Makey, and Bare Paint, as well as the science behind how they worked, followed by students creating (and then drying) their artwork. We then allowed students to hook their work up to the Makey Makey kits and laptops to test their creations. The students had a little over an hour to experiment on Scratch and tweak their artwork, leading to some really spectacular creations. It might be a good idea to have some backup projects, such as a writing assignment or Snap Circuits, available for students who finish early.
Additionally, if you have an afterschool teen club or a Teen Advisory Board or Council, doing a practice run of this program might be a good idea. This also allows the teens in your library to create example projects to inspire students in the workshop.
To recruit students for our Teen Tech Week Create It! Camp workshops, I worked closely with school librarians. I created a survey asking students to rank their interest level in coding, gaming, and the arts on a scale from 1 to 10, and I also asked them to describe what kind of application they might like to create. The school librarians distributed these surveys and we used the responses to identify students who might be interested in participating in Create It! Camp. Once the students were selected (about ten students from each school), the school librarians and I collaborated on a permission form and image release form that would cover all parties involved.
The Hopewell Museum was able to secure funding to pay for students’ transportation to the museum for the workshops via the local Rotary Club. There are probably many funding opportunities like this available throughout your community from local Rotary and Kiwanis clubs, to name a few. You might also be able to secure funding to help with transportation of students, or the purchasing of technology, from your local Friends of the Library group (or through the resources provided by YALSA!).
Evaluation
We evaluated this program based on the number of students involved and the number of artworks created, as well as the school’s willingness afterwards to participate in the program again. Our initial estimate was that we would reach about 10-20 students, and the 50 students we ended up with was a pleasant surprise. Additionally, most of the teens involved in this project were new to the library, an added bonus! We ended up with about 55 artworks of many sizes, shapes, and levels of difficulty, and about 15 students created new programs on Scratch to accompany their projects. 35 students either edited programming blocks on Scratch or engaged in some level of coding. Our initial goal was to have at least 50% of the students gain some experience with coding on Scratch in addition to creating an art project.
Additionally, to measure the success of our Teen Tech Week program and encourage continued experimentation with coding and maker technologies at our library, we created a biweekly afterschool Coding Club for teens, which continued to use the Makey Makey kits and Bare Paint used in Create It! Camp, with projects of increasing levels of difficulty on Scratch and Python. Five teens who had attended Create It! Camp attended at least one of the Coding Club meetings because of their experience in the workshops. Creating follow-up programs for larger workshops and events like this is a lot of fun and it’s a great way to maintain interest in the library for teens new to our services.
Finally, the teachers and librarians who attended these workshops with the students were pleased with the program and with how the students responded to it, and this program will return in the fall as a monthly workshop event, with schools participating on a rotating basis. This continued opportunity for community engagement in itself makes the program a success to us.
One of the goals of Create It! Camp was for this to be a largely teen-led program, and each group of students had varying skill levels and abilities, leading to very different program results with minimal input from adult supervisors. The success of making this program teen-led was dependent on how comfortable the students felt experimenting at their own pace.
Other resources
Coding Games in Scratch by John Woodcock
Scratch Programming for Teens by Jerry Lee Ford, Jr.
Scratch’s main website. Click “Try It Out” for a tutorial or search for “Makey Makey” for relevant projects. http://scratch.mit.edu
Bare Paint’s website. Browse fun example projects and accessories. www.bareconductive.com
Makey Makey’s How-To website for the Classic invention kit. See a step-by-step setup guide and a list of projects to test your kit out on. http://makeymakey.com/how-to/classic/